Showing posts with label Window Server 2000. Show all posts

Thursday, February 17, 2011

Install and Configure Python in Windows Server 2008/2003 (IIS 6.0 or 7.0)? 1. Install Python

1. Install Python


Go to Python official website http://www.python.org/download/ and download the latest Windows installer (.msi). Follow the screen and install it.

2. Configure IIS Web Service Extensions


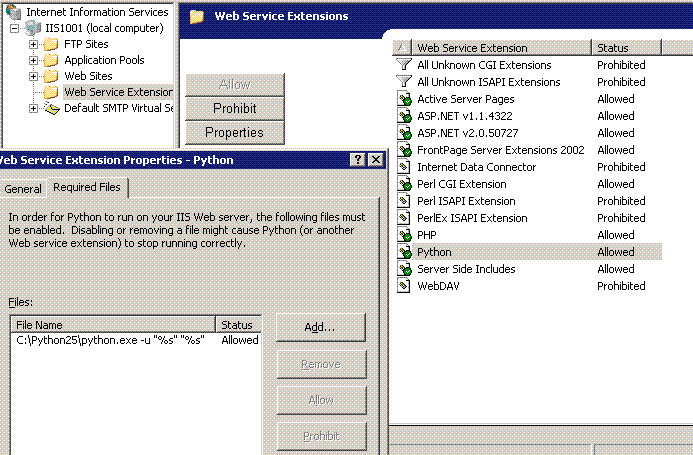
Open Start -> Administrative Tools > Internet Information Services (IIS) Manager. Click "Web Service Extensions" and add a new web service 'C:\Python25\python.exe -u "%s" "%s"'.


3. Configure Website to Enable Python


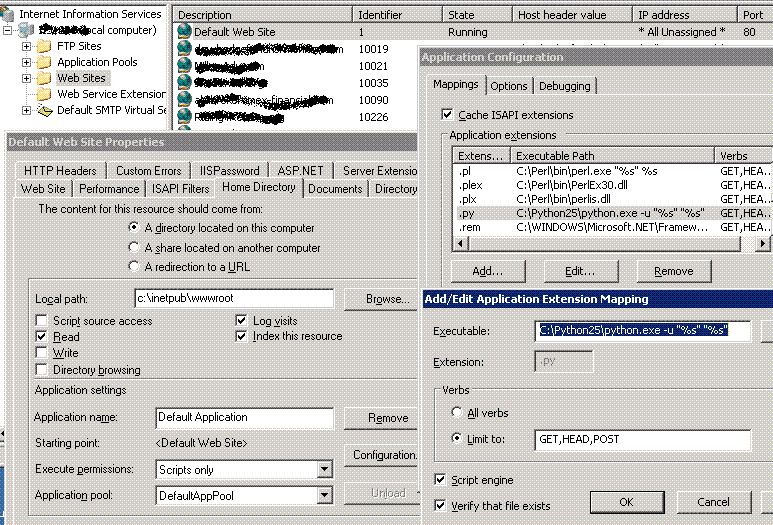
Go to website that you want to eanble Phyton. Right click the website and go to Properties > Home Directory > Configurations > Mappings. Add a new script mapping ".py" with 'C:\Python25\python.exe -u "%s" "%s"'.

4. Test Python


Write a test file test.py and test it out. Everything should work now.

print
        print 'Status: 200 OK'
        print 'Content-type: text/html'
        print
        print ''
        print '

This is a header

' print '' #this is a comment print 'See this is just like most other HTML' print ' ' print ''
 

5. Configure Control Panel (Optional)


If you have a control panel for your server, you may need to configure it as well. Below is a sample for Helm control panel.


Tuesday, February 15, 2011

Use policy to control bluecoat ProxySG administrator access

 If you would like to control administrator access to the ProxySG Management Console and CLI, you can create policy to configure administrator access privileges.

Using policy rules, you can require administrators to identify themselves by entering a username and password and specify whether read-only or read-write access is given. You can make this policy contingent on IP address, user name, group membership (if credentials were required), and many other conditions.

This solution assumes you have already configured users and groups for authentication (using RADIUS, LDAP, Microsoft Active Directory, or other authentication servers) and created a realm on the ProxySG to connect to these servers.

Procedure to follow

To create policy for ProxySG administrator access:

1. Launch the Visual Policy Manager.
2. Create an Admin Authentication layer (Policy > Add Admin Authentication Layer ).
3. In the Admin Authentication layer, specify the authentication realm that will be used to authenticate administrative users of the ProxySG:
* Right-click in the Action column and choose Set.
* Select New > Authenticate.
* Select the authentication mode and realm. (See ProxySG Authentication Modes.)
* Close the dialogs.
4. Create an Admin Access layer (Policy > Add Admin Access Layer).
5. In the Admin Access layer, define who is allowed to access the ProxySG:

* Right-click in the Source column and choose Set.
* Select New.
* Select the entity (for example, Client IP address/subnet, User, Group) and configure the specifics.
* Close the dialogs.

6. Specify the type of administrator read/write access:

* Right-click the Action column and select Allow Read-only Access or Allow Read/Write Access.

7. By default, the policy applies to any service (HTTP/HTTPS in the Management Console and SSL in the CLI). If you want to control access to just the MC or just the CLI:

* Right-click in the Service column and choose Set.
* Select New > Service Name.
* Select the service you want the rule to apply to (HTTP-Console, HTTPS-Console, or SSH-Console).
* Close the dialogs.
8. Install the policy.

Thursday, February 3, 2011

What should I be aware of when upgrading from version 4.0 to 2000

When upgrading from Version 4.0 to Check Point 2000, the Management Station checkbox in the Workstation Properties window will be checked only for the Management Station being upgraded. All other gateways defined on the Management Station will have the Management Station checkbox unchecked by default.

When you upgrade, the $FWDIR/lib/control.map file is replaced. If you have made any changes
to control.map, they will not be preserved in the new control.map, so you must make the same changes in the new version.


Session Authentication Agent — Installing the Version Check Point 2000 Session Authentication Agent does not overwrite the Version 4.0 Session Authentication Agent. You must uninstall the Version 4.0 Session Authentication Agent (using the Control Panel’s Add/Remove Programs applet) and then install the Version Check Point 2000 Session Authentication Agent. Note that the Session Authentication Agent is shut down as part of the uninstallation process, so you must manually restart it (or reboot).


VPN-1/FireWall-1 HP Open View Extension supports Solaris and HP-UX with HP OV version 4.x. HP-UX with HP OV versions 5.x and 6.x is not supported.

 Synchronized VPN/FireWall Modules —

    Synchronized VPN/FireWall Modules must be managed by the same Management Module.
    SecuRemote connections can be synchronized.

Enable Exportable SKIP: If Enable Exportable SKIP (in the Encryption tab of the Properties Setup window) is checked, then if an internal VPN/FireWall Module has Local selected in the Key Manager tab of its SKIP Properties window, you must generate an exportable DH key for it (in its SKIP Properties window). Selective SKIP configuration (that is, some SKIP communications use exportable DH keys and some use non-exportable DH keys) can only be managed in the Rule Base.

Control channel encryption key If you change a Management Server’s control channel encryption key (for example, by using the fw putkey command), then you must restart any ELA proxy that is running on that Management Server. See "Uninstalling VPN-1/FireWall-1" on page 6 for information on how to stop the ELA proxy.

In a High Availability configuration, each VPN/FireWall Module’s license should be issued to its hostid or other unique ("heartbeat" or "configuration IP" interface), since any of the other interfaces can fail.

Do not rename a network object group that is used in the definition of a Logical Server.

Unix platforms — when remote modules are configured using the cpconfig program, if you try to add a new remote module you will not be able to see the list of previously configured modules. However, these modules are still defined and there is no need to reconfigure them. If you do reconfigure them, you must run fw putkey command again for each module.

backward compatibility feature:  If you are using the VPN-1/FireWall-1 Check Point 2000 backward compatibility feature to manage VPN-1/FireWall-1 Version 4.0 SP1 or SP2 FireWall Modules and you use Client Authentication rules, the following workaround must be applied:

a. Edit the file $FWDIR/lib/base.def (where FWDIR specifies the directory in which the VPN-1/FireWall-1 Version 4.0 software or VPN-1/FireWall-1 Check Point 2000 backward compatibility module is installed), replacing the lines:

define pm_prog [(UDPDATA+40+rpc_cred_len+rpc_ver_len),b]
#define pm_prot [(UDPDATA+48+rpc_cred_len+rpc_ver_len),b]

by the lines:

#define pm_prog [68, b]
#define pm_prot [68+8, b]

b. Reinstall the Security Policy on the VPN/FireWall Module.

fw expdate command — This command changes the expiration date of the users in the VPN-1/FireWall-1 users database. Any open GUI Client should be closed before running the command, otherwise the GUI will override the changes made by the command. On NT only, if fw expdate is executed while the Management Server was running, the Management Server should be restarted in order for the command to take effect.


Wednesday, February 2, 2011

What's new in Checkpoint 2000 version 4.1

    1)High Availability — Two or more VPN/FireWall Modules can be configured so that each one acts as a backup to the others. Additionally, the VPN/FireWall Modules can be synchronized so that connections will not be lost when a VPN/FireWall

    2)Desktop Policy Verification — Policy Servers now maintain open connections with SecureClients and are immediately notified when a SecureClient is re-configured. Both Session Authentication and Client Encrypt rules can be applied only when a SecureClient is properly configured.
    3)SecuRemote
        i)The Secure Domain Logon feature enables Windows NT SecuRemote users to securely log on to a domain controller using both LAN and dial-up connections.
        ii)SecuRemote Clients can be configured to automatically update a site’s topology either when starting SecuRemote or just before the key exchange with that site.
        iii)SecuRemote Clients can be configured to automatically check the availability of a newer version of SecuRemote Client software before connecting to a site.
        iv)SecuRemote Clients can be pre-configured with a partial site topology to reduce exposure of sensitive network information. The first time the SecuRemote Client connects to a site, the user will be given the opportunity to download the complete topology over the authenticated connection.
        v)A smaller SecuRemote (Thin Client) Client installation file set (without the certificate functionality) is available ("Thin Client")  

    4)Hybrid Mode — VPN-1/FireWall-1 Hybrid Mode authentication extends IKE, enabling it to use any authentication method supported by VPN-1/FireWall-1. 

   5)Intel RNG — VPN-1/FireWall-1 and SecuRemote support the Intel RNG (pseudo random number generator) hardware for Windows NT 4.0, Windows 98, Windows 95 (OSR2 or later or Windows 95 with IE 3.02 or later). 

    6)Remote Licensing Management — This feature enables the system administrator to manage VPN-1/FireWall-1 licenses on remote VPN/FireWall Modules from the Management Station. 

    7)Malicious Activity Detection — VPN-1/FireWall-1’s Malicious Activity Detection (MAD) feature provides a mechanism for detecting intrusion attempts or other suspicious events and notifying the system administrator by an alert or email message. 

Saturday, January 29, 2011

How to obtain debug information from the daemons

You will need to kill the fwd daemon and restart it with a debug option
UNIX:

1. Go to $FWDIR/bin
2. Kill the relevant daemon with fw kill {fwd | fwm}
3. Restart the daemon with debug messages. Use 'fwd -d' or 'fwm -d'

NT:

1. Issue fwstop.
2. Enter %SystemRoot%\fw\bin and issue 'fw d -d' or 'fw m -d'.
3. Issue fwstart.

Wednesday, January 26, 2011

How to redirect logs to a different partition

For logging on Windows :
Regedit
go to HKEY_LOCAL_MACHINE\SOFTWARE\CheckPoint\FW1\5.0
create FWLOGDIR and put the full path to the log you want to go to

For logging on Unix :
ln -s /path/to/new/logdir $FWDIR/log
If you're talking about Windows NT then there is a registry hack.

enter the HKEY_LOCAL_MACHINE\SOFTWARE\CheckPoint\FW1\4.1 path and add a new
string value form the edit-->new menu. name it FWLOGDIR.
add the directory name that you wsih to log to, and create the directory.
then bounce the firewall (fwstop/fwstart).

Monday, January 24, 2011

procedure for moving the management server on WIndows 2000

1. Install the FireWall-1 software on the 2000 server. When setting this software up, designate the firewall module as a remote module. You will be prompted for a
secret key to authenticate management commands. YOU MUST USE THE SAME KEY OF THE FIRST TIME, OR EVEN DO PUTKEYS AGAIN.

2. Remove current objects.* from the 2000 server

3. Transfer these files from the SOLARIS management module to the new 2000 managment module (FTP is fine):

$FWDIR/conf/objects.C (objects and properties)
$FWDIR/conf/*.W (security policy)
$FWDIR/conf/rulebases.fws (Combined rule bases for GUI clients)
$FWDIR/conf/fwauth.NDB (User database)
$FWDIR/conf/fwmusers Adminstrators
$FWDIR/conf/gui-clients Allow GUI Adminstrative hosts

Note: Any *.NDB files must be transferred in binary mode. All other files should be transferred in ASCII mode.

3. Restart the 2000 management station.

4. Sometimes it is neccessary to regenerate the rulebases.fws file and objects.C files once moved to the new management station. This is done when you no longer see your rulebases or objects once you login to the Gui Client on the new mangement console.


Monday, December 13, 2010

Configure Terminal Services Session Directory Service

The Terminal Services Session Directory service is a database that keeps track of sessions on terminal servers in a cluster and provides the information that is used at connection time to connect users to previously-existing sessions.

The Session Directory server can be any Windows Server 2003-based computer that is visible on the network and that is running the Terminal Services Session Directory service. As a best practice, the Session Directory server should be a highly available network server that is not a terminal server.

There are two methods you can use to configure Session Directory settings:

Use Group Policies (Best Practice)

  1. Click Start, click Run, type gpedit.msc, and then press ENTER.
  2. Double-click the following items, and then enable the Session Directory Active policy:
    • Computer Configuration
    • Administrative Templates
    • Windows Components
    • Terminal Services
    • Session Directory
  3. Enable the Session Directory Server policy, and then type the name of the server where the Terminal Services Session directory service is running in Session Directory Server.
  4. Enable the Session Directory Cluster Name policy, and then type the name of the cluster to which the Terminal Server belongs in Session Directory Cluster Name.
NOTE: Use this method to configure the local Group Policy Object. To change a policy for a domain or an Organizational Unit, you must log on to the first domain controller as an administrator. Then, you must invoke the Group Policy through the Active Directory Users and Computers snap-in. For information about how to apply a Group Policy to groups of users or computers, see Configuring Terminal Services with Group Policies. Note that a Group Policy overrides a configuration that is set with the Terminal Services Configuration tool.

Use the Terminal Services Configuration Tool

  1. Click Start, point to Administrative Tools, and then click Terminal Services Configuration.
  2. In the console tree, click Server Settings.
  3. In the Details pane, right-click Session Directory, and then click Properties.
  4. Click to select the Join session directory check box.
  5. In the Cluster name box, type the name of the terminal server cluster for this terminal server.
  6. In the Session directory server name box, type the DNS name or IP address of the domain server where the Terminal Services Session Directory service is running. Note that the server name must be a valid server name, and you cannot leave this box empty. Also, the server name cannot be localhost or 127.0.0.1.

Sunday, December 12, 2010

How To Configure Terminal Services for Remote Administration Mode in Windows 2000

Installing Terminal Services

You can install Terminal Services in two modes: Application Server mode and Remote Administration mode. Application Server mode is used for thin-client environments in which users have lightweight PCs and run programs remotely on the server instead of locally. Application Server mode requires a license for each connected user.

Remote Administration mode allows two low-resource simultaneous connections that are ideally suited for remote administration. No additional licenses are necessary, and the limit cannot be increased. This document describes Remote Administration mode.

To Install Terminal Services

  1. Insert the Windows 2000 Server CD-ROM into the CD-ROM or DVD-ROM drive.
  2. If a dialog box appears automatically after you insert the CD-ROM, click Install Add-on Components. If no dialog box appears, click Start, point to Settings, and then click Control Panel. Double-click Add/Remove Programs, and then click Add/Remove Windows Components.
  3. In the list of components, click to select the Terminal Services check box.
  4. Click to clear the Terminal Services Licensing check box if it is selected. You do not need this service for Remote Administration mode. Click Next.
  5. Click Remote Administration Mode, and then click Next.
  6. The Terminal Services Wizard runs and installs Terminal Services. Close the wizard when it is finished, and then reboot your computer if you are prompted to do so.

Connecting to Terminal Services

To connect to Terminal Services running on a server, you must use a Terminal Services client. The client is available on the server on which you installed Terminal Services, in the following folder:
%SystemRoot%\System32\Clients\Tsclient\Net\Win32
Create a share on your server so that you can easily install the client on any computer.

To Create a Share on Your Server

  1. Use Windows Explorer to locate the %SystemRoot%\System32\Clients\Tsclient\Net\Win32 folder. Note that %SystemRoot% may be the C:\Winnt folder.
  2. Right-click the Win32 folder, and then click Sharing.
  3. On the Sharing tab, click Share this folder.
  4. Change the share name to TSClient.
  5. Click Permissions.
  6. Click to clear the Full control and Change check boxes. Only the Read permission should be selected.
  7. Click OK, and then click OK.
Follow the next steps on the computer from which you want to perform remote administration. The Terminal Services client runs on any 32-bit version of Windows, including Microsoft Windows 95, Microsoft Windows 98, Microsoft Windows Millennium Edition (Me), Microsoft Windows NT 3.5x and 4.0, Microsoft Windows 2000 Professional, and various server versions. Connect to the share you created earlier. The share is named \\Servername\TSClient, where Servername is the name of the computer on which you installed Terminal Services. You do not have to follow the uppercase and lowercase convention that is used in this article.

To Install the Terminal Services Client

  1. Connect to the \\Servername\TSClient share that you created earlier.
  2. Double-click Setup.exe.
  3. Click Continue in the dialog box that appears, and then type your name and organization in the next dialog box.
  4. Click I agree (if you agree) when you see the license agreement.
  5. Click the large button in the next dialog box. You can change the installation path first, if you want to.
  6. Click Yes when you are prompted whether you want all users to have the same initial settings.

Using the Terminal Services Client

Before you can manage your Terminal Services servers remotely, you must create a connection to these servers. This procedure uses the Client Connection Manager tool to create icons for all of the Terminal Services servers you want to manage.

To Create a Connection to the Terminal Services Server

  1. Click Start, point to Programs, point to Terminal Services Client, and then click Client Connection Manager.
  2. When the Client Connection Manager Wizard starts, click Next.
  3. In the Connection name box, type a descriptive name for the connection.
  4. In the Server name or IP address box, type the server's name or IP address, or click Browse to search for the server. When you are done, click Next.
  5. Leave all automatic logon information blank. Using automatic logon information might present a security problem if a non-administrator has access to the computer from which you run the client. Click Next.
  6. Click a screen resolution that is appropriate for you. It is best to use the largest area you can select (the client does not let you select an area that is larger than your local screen can display). Do not select Full screen at this time; you can toggle between windowed and full screen modes later. Leaving the initial connection in a window helps reinforce the fact that you are working on a remote computer rather than your local workstation. Click Next.
  7. Leave the Enable data compression and Cache bitmaps check boxes clear. They are useful only if you are working over a slow dial-up link. Click Next.
  8. Leave the Start the following program check box clear. You want the client to display the server's desktop. Click Next. Change the icons if you want to. Click Next. Click Finish to complete the wizard.
This process creates an icon for your server. Double-clicking the icon connects you to the server. You can also right-click the icon to change the connection properties if you need to.

To Connect to the Server Using Terminal Services

  1. Double-click the server icon in Client Connection Manager.
  2. The Terminal Services client window appears and displays the server's logon dialog box. You might need to double-click the window's title bar to see it all.
  3. Type an appropriate set of credentials to log on to the server. Typically, you will log on as some kind of administrator (local, domain, or enterprise).
  4. If you use correct credentials, you see the server's desktop.
Note that this is very different from using a remote-control product. You are not manipulating the keyboard, mouse, and screen at the server. Instead, you are logged on to the computer and have created a new session, but this session is displayed remotely, over Terminal Services, rather than locally at the computer. You do, however, have full access to the computer's programs just as if you were working at its local console.

Disconnecting the Terminal Services client

There is an important distinction between disconnecting from a session and logging off. If you only close the Terminal Services client window, your session remains active on the server. When you connect again, Terminal Services reconnects you to that session. Any programs that you left running in the session are still available. To end the session, you need to log off by using the remote computer's Start menu. Note that this logs you off and ends the remote session. It does not log off the user at the computer's local console.
Friday, December 10, 2010

Installation of DHCP service on window server 2000

Installing the DHCP Service

You can install DHCP either during or after the initial installation of Windows 2000 Server or Advanced Server, although there must be a working DNS in the environment. To validate your DNS server, click Start, click Run, type cmd, press ENTER, type ping friendly name of an existing DNS server in your environment, and then press ENTER. An unsuccessful reply generates an "Unknown Host My DNS server name" message.

To install the DHCP Service on an existing Windows 2000 Server:
  1. Click Start, click Settings, and then click Control Panel.
  2. Double-click Add/Remove Programs, and then click Add/Remove Windows Components.
  3. In the Windows Component Wizard, click Networking Services in the Components box, and then click Details.
  4. Click to select the Dynamic Host Configuration Protocol (DHCP) check box if it is not already selected, and then click OK.
  5. In the Windows Components Wizard, click Next to start Windows 2000 Setup. Insert the Windows 2000 Advanced Server CD-ROM into the CD-ROM drive if you are prompted to do so. Setup copies the DHCP server and tool files to your computer.
  6. When Setup is complete, click Finish.

Configuring the DHCP Service

After you install and start the DHCP service, you must create a scope (a range of valid IP addresses that are available for lease to the DHCP clients). Each DHCP server in your environment should have at least one scope that does not overlap with any other DHCP server scope in your environment. In Windows 2000, DHCP servers within an Active Directory domain environment must be authorized to prevent rogue DHCP servers from coming online and authorizing a DHCP Server.

When you install and configure the DHCP service on a domain controller, the server is typically authorized the first time that you add the server to the DHCP console. However, when you install and configure the DHCP service on a member server, you need to authorize the DHCP server.

Note A stand-alone DHCP server cannot be authorized against an existing Windows Active Directory.

To authorize a DHCP server:
  1. Click Start, click Programs, click Administrative Tools, and then click DHCP.

    Note You must be logged on to the server with an account that is a member of the Enterprise Administrators group.
  2. In the console tree of the DHCP snap-in, select the new DHCP server. If there is a red arrow in the bottom-right corner of the server object, the server has not yet been authorized.
  3. Right-click the server, and then click Authorize.
  4. After a few moments, right-click the server again and then click Refresh. The server should display a green arrow in the bottom-right corner to indicate that the server has been authorized.
To create a new scope:
  1. Click Start, click Programs, point to Administrative Tools, and then click DHCP.

    Note In the console tree, select the DHCP server on which you want to create the new DHCP scope.
  2. Right-click the server, and then click New Scope. In the New Scope Wizard, click Next, and then type a name and description for the scope. This can be any name that you choose, but it should be descriptive enough to identify the purpose of the scope on your network. For example, you might use Administration Building Client Addresses.
  3. Type the range of addresses that can be leased as part of this scope, for example, a starting IP address of 192.168.100.1 to an ending address of 192.168.100.100. Because these addresses are given to clients, they should all be valid addresses for your network and not currently in use. If you want to use a different subnet mask, type the new subnet mask. Click Next.
  4. Type any IP addresses that you want to exclude from the range you entered. This includes any addresses that may have already been statically assigned to various computers in your organization. Click Next.
  5. Type the number of days, hours, and minutes before an IP address lease from this scope expires. This determines the length of time that a client can hold a leased address without renewing it. Click Next to select Yes, I want to configure these options now, and then extend the wizard to include settings for the most common DHCP options. Click Next.
  6. Type the IP address for the default gateway that should be used by clients that obtain an IP address from this scope. Click Add to place the default gateway address into the list, and then click Next.

    Note When DNS servers already exist on your network, type your organization's domain name in Parent domain. Type the name of your DNS server, and then click Resolve to ensure that your DHCP server can contact the DNS server and determine its address. Then click Add to include that server in the list of DNS servers that are assigned to the DHCP clients. Click Next.
  7. Click Yes, I want to activate this scope now, to activate the scope and allow clients to obtain leases from it, and then click Next. Click Finish.

Troubleshooting

  • Clients are unable to obtain an IP address
    If a DHCP client does not have a configured IP address, it generally means that the client has not been able to contact a DHCP server. This is either because of a network problem or because the DHCP server is unavailable. If the DHCP server has started and other clients have been able to obtain a valid address, verify that the client has a valid network connection and that all related client hardware devices (including cables and network adapters) are working properly.
  • The DHCP server is unavailable
    When a DHCP server does not provide leased addresses to clients, it is often because the DHCP service has failed to start. If this is the case, the server may not have been authorized to operate on the network. If you were previously able to start the DHCP service, but it has since stopped, use Event Viewer to check the system log for any entries that may explain the cause.

    Note To restart the DHCP service, click Start, click Run, type cmd, and then press ENTER. Type net start dhcpserver, and then press ENTER.